
LINDA I have accepted myself into this strange world. Have you yet accepted yourself? I am obsessed with doing well in school, just another typical asian, yeh? :D ooo
title: Tutorial for wood grain This is a tutorial for wood grain, its very easy, requires no layers and takes about 5 minutes to make. It does require very basic knowledge of photoshop, such as where some tools are but nothing else. It takes a LONG time to do all this so please respect my work! I've searched long and hard for free wood grain patterns, but I have never seen any free wood grain patterns, you'll have to buy them on sites like fotosearch so I decided to create a subsitute that will work just as well :). 1. Open a file in photoshop and make it around 300x300 or a good size to work with and you can title it anything, Wood, Wood grain, grain... ect. Then press OK. 2. Next you want to make the base of the wood, any color you want your wood to be, I have #844c0a but you can make your color any type of a woodish color, in the brown to brownish red tones. 3. Click on the paint bucket tool and fill the background with your color. (If you cannot find the paint bucket tool, you probably have a photoshop in the CS series so click on and hold on the gradient tool until a rectangle pops up next to it with 2 choices, gradients and paint bucket. Click on the paint bucket tool and color your blank square in.) 4. Now your background is a brown color, go to the top of the screen where it has all the things like File, Edit, Image, Layer etc.. and go to Filter> Noise> Add noise. Then check uniform, set the amount to 20% and check monochromatic. Then click OK. Match my setting in the image shown... 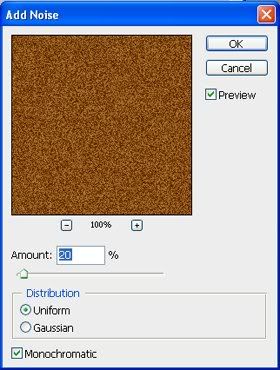 5. Then go to Filter>Blur>Gaussian Blur and set the radius to around 1.5 pixels. Too much will make it too blurry, too less will make really sharp, but you can have sharp wood if you desire. 6. Wood isnt that grainy so to straighten it out some, Go to Filter>Blur>Motion blur and set that to an angle of 90 and blur around 18. I have mine at 18, but it also looks good at 38, just more smooth. 7. There you go, you made your own piece of wood! Now you can tile it to make backgrounds, layouts, etc! The finished product: 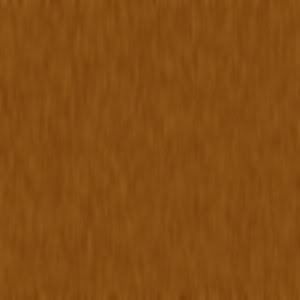 Labels: Tutorials Posted by Linda @ 3:27:00 PM
|
|